


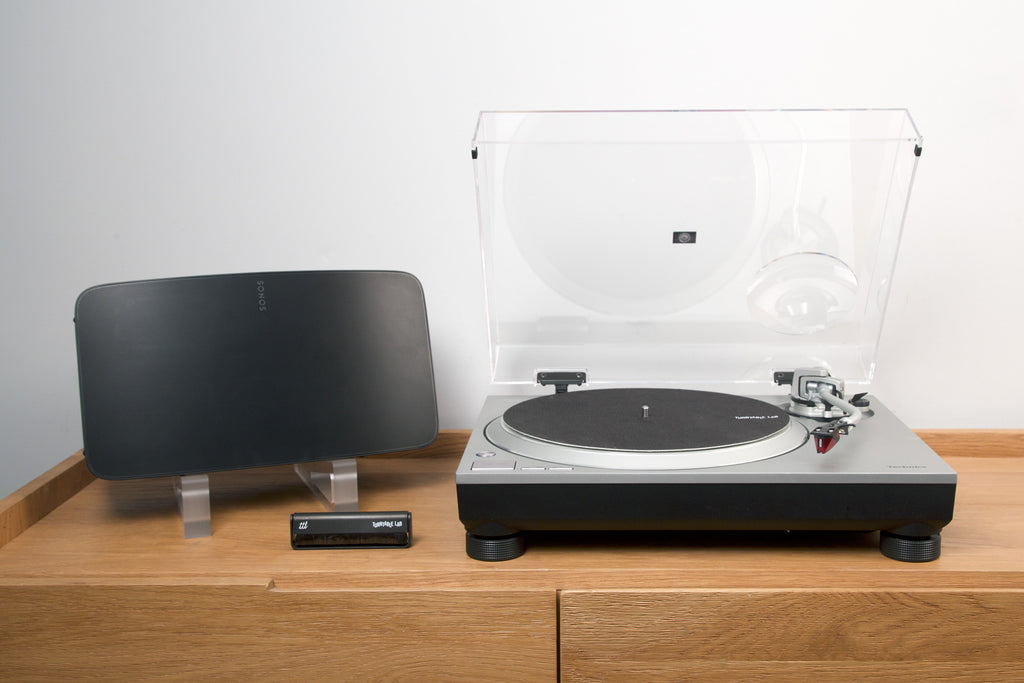
TTL Setup: Technics SL-1500C / Sonos Five
Congratulations on your new TTL Setup! Here are detailed instructions on how to completely set up your Technics SL-1500C turntable and Sonos Five speaker, plus some tweaks for optimizing the setup.
1.0 SET UP YOUR SONOS FIVE

1.1
Unpack + plug in your Sonos Five.
1.2
Download the Sonos app on your mobile device and create an account (or log into your existing account), then follow prompts to set up your new Sonos Five on your device.
2.0 SET UP YOUR SL-1500C TURNTABLE
2.1
Find a clear surface to unpack the contents of the box. Here are things you should locate:
- Platter
- Counterweight - embedded in the styrofoam
- Cartridge - embedded in the styrofoam
- 45 Adaptor - embedded in the styrofoam
- Auxiliary Weight - embedded in the styrofoam, you will NOT need this for this setup, but we suggest you set aside for use in the future
- RCA Cable
- Power Cable
- Groundwire - you will not need this for this setup, but we suggest you set aside for use in the future
- Dustcover
- Instruction Booklet (here's a link to the PDF)
- note: the Groundwire is used for setups that have an external preamp; the SL-1500C has a built-in preamp

2.2
SET THE PLATTER
- remove the white plastic protector underneath the platter
- using your index fingers, grab the platter by the (2) holes, place the platter on the turntable spindle

2.3
SET UP THE TONEARM
- Screw the headshell & cartridge assembly onto the tonearm, take off the needle guard
- Remove the blue styrofoam block from the tonearm area
- Screw on the counterweight with the black number dial facing forward
- We'll calibrate your tonearm last in STEP 4.4

2.4
Go to the back input area of your turntable.
- IMPORTANT: Make sure LINE OUT is set to ON (this activates the built-in preamp)
- Plug-in the RCA cables to the LINE OUT.
- NOTE: If you ever want to add an external phono preamp to your system, you would plug in to the Phono Out and use the included groundwire.
- AUTO LIFT UP - This controls the feature that automatically raises the tonearm at the end of the record. This helps preserve your stylus life. We recommend, keeping this ON.
- DUSTCOVER - Now install your dustcover by inserting the hinges to the back of the turntable.

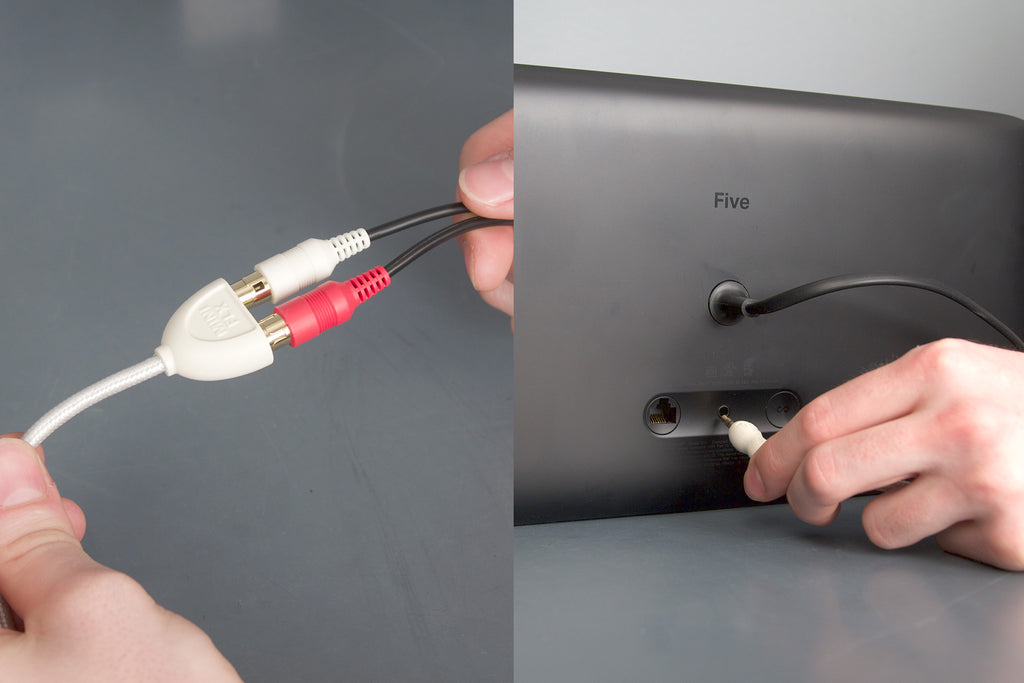
2.5
Locate the white Audioquest adaptor we sent you with your TTL Setup, plug that into the other end of the RCA cable, and plug the adaptor into your Sonos Five.
3.0 SET UP YOUR SONOS APP TO PLAY VINYL
3.1
Open the Sonos App on your device and scroll down. Select LINE IN > select YOUR SONOS DEVICE.

3.2
Do a quick test: place a record on the turntable, turn on the power and hit play. Place the needle on the record (you can you use the tonearm lift lever at the base of the tonearm to drop the needle). Music should play, but we're not done yet...
4.0 TWEAKS FOR BETTER VINYL PERFORMANCE
4.1
Select SETTINGS ICON (the gear ⚙️) on bottom of the app. Select your SYSTEM.
4.2
Scroll down to LINE-IN.

- For Source Name, select TURNTABLE.
- For Source Level, we recommend setting to LEVEL 10 for louder experience.
- For Audio Delay, we recommend MEDIUM, this eliminates that weird lag between when you put the needle on the record and when the sound plays.
- NEW 05/24: With the recent Sonos app update, the Autoplay setting has been removed. For now, you will have to go to step 3.1 every time you switch sources to your turntable.
4.3
Not necessary at setup but under SOUND, explore EQ + Trueplay (this feature optimizes your sound to your room; it uses your mobile device’s mic to determine wall placement) to customize your sound.
4.4
Balance your tonearm. Watch the below video first.
- After balancing tonearm, set the Counterweight AND Anti-Skate to "1.8"
- Locate the LOCK on the base of the tonearm and "unlock"
- Lift the base of the tonearm to "4", then turn the lock back
5.0 TROUBLESHOOTING
5.1
My turntable is not spinning, even though it is plugged in and on. Make sure you installed the belt properly. Make sure you hit the power switch on the left side of the turntable.
5.2
The sound output is super quiet. Make sure the switch on the underside of the turntable is set to LINE OUT.
5.3
There’s a weird delay from when I put on the needle to when I hear my music. Make sure to set your Audio Delay settings to MEDIUM or LOW (see 4.2).
5.4
The Five does not recognize when my turntable is playing. Under the MUSIC ICON, make sure that you have LINE IN selected. For your Five to automatically do this when your turntable is playing, go to Autoplay settings and turn it on that option (see 4.2).
6.0 UPGRADES (SOLD SEPARATELY)
6.1
The 2M Red Cartridge that comes with your turntable is a solid cartridge. When it's time to switch styluses or you just want an upgrade, check out the Ortofon 2M Blue Stylus. It works with your current cartridge body and it's very easy to install. With its nude diamond stylus (vs. your diamond tip), it will provide better sound definition and forgiveness.

6.2
Your turntable has a sturdy direct drive motor. We recommend a hefty record stabilizer like the Mastersounds Record Weight. This will further dampen unwanted vibrations / interference for a cleaner sound.

6.3
The Funk Firm Achromat has long been a favorite of audiophiles who mod their Technics for hi-fi listening. This special polymer mat that absorbs vibrations from the Technics metal platter.

6.2
Line Phono: Acrylic Anglers - These aesthetically pleasing stands will lift your Five off of surfaces, lessening sound deflection while angling the output slightly upward.

6.3
Turntable Lab: Triple Operation Brush - The Carbon Fiber brush that came with your setup is great for everyday usage (we use one in our office). However, our new Triple Operation brush is on another level in terms of effectiveness with dual cleaning pads plus an integrated carbon fiber brush.

