


TTL Setup: MMF 1.5.ttl Turntable / Audioengine Speakers
Congratulations on your new TTL Setup! Here are detailed instructions on how to completely set up your MMF 1.5.ttl turntable and Audioengine speakers, plus some tweaks for optimizing the setup.
1.0 SET UP YOUR AUDIOENGINE SPEAKERS
1.1
Unpack your Audioengine speakers + locate the accessories + cables as shown. Locate the speaker wire which be used to connect the (2) speakers together. For the A2's the speaker wire is clear, for the A5's the speaker wire is black with gold banana plugs.

1.2
Position your speakers. NOTE: Position the powered unit on the left.

1.3
Plug in your speakers + connect them together using the speaker wire.

2.0 SET UP YOUR MMF 1.5.ttl TURNTABLE
2.1
Unpack your turntable onto a flat surface, locate these parts:
- Headshell / Cartridge - embedded into styrofoam
- Counterweight - embedded into styrofoam
- Dustcover Hinges - embedded in styrofoam
- Metal Platter + Record Mat
- RCA Cable + Power Supply (located in small white box)
- Dustcover

2.2 Setup The Tonearm
- Now, locate the Counterweight and screw it onto the tonearm about three quarters of the way in.
- Take the headshell and screw that on as well.
- Take off the clear plastic stylus guard.
- Note: We'll discuss calibrating your tonearm at the end of this guide.


2.3 Install The Platter + Setup The Belt
- flip the platter over
- locate the red ribbon and WITHOUT dislodging the ribbon, remove the piece of tape, and position the ribbon as shown below

- flip the platter back over, black side up
- using the (2) finger holes, place the platter on turntable

- spin the platter so the ribbon is at 8 o'clock position, which reveals the copper colored motor pulley underneath.
- grab BOTH sides of the ribbon and pull the attached belt around the copper motor pulley. now you can dispose of the ribbon.

2.4
Go to the back input area of your turntable.
- IMPORTANT: make sure the Phono-Line switch is positioned to LINE.
- Plug-in the RCA cables and attach the u-shaped groundwire into the silver post and tighten the screw-down clamp.
- Attach the other end of the RCA cables to your speaker. NOTE: the groundwire will not be connected to the speaker. You can leave it dangling.
- NOTE: If you ever want to add an external phono preamp to your system, you would attach the groundwire on both sides of the cable and turn that switch on the back of the turntable to PHONO.
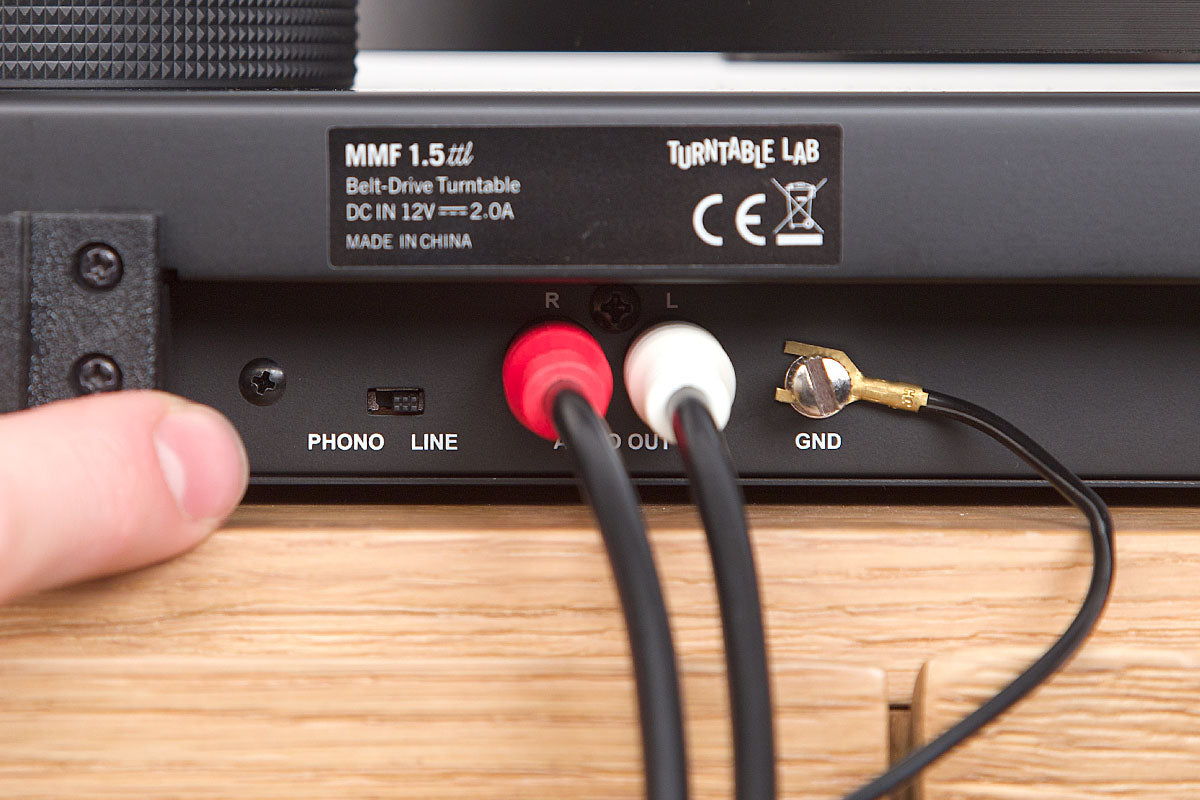
2.4
Plug in the turntable's RCA cable to the speaker as shown.
NOTE: The Groundwire does not need to be connected to the speaker, it can remain loose.

3.0 PLAY A RECORD!
3.1
Place a record on the turntable, turn the power knob on the left side of the turntable (the platter should start to spin), then place the needle on the record (if you’re new to vinyl, you may want to use your turntable’s lift lever to gently lower the needle onto the record).

3.2
Power on your speakers!
If you have A5's and you don't hear anything, press the front-panel volume knob to cycle through inputs until you hear something. (the A2 plays all inputs simultaneously).

4.0 TWEAKS
4.1
We recommend balancing your tonearm. Watch the video below for a general guide on how to do this with most turntables.
- When the video calls for recommended weight, set to "2".
- For the Anti-Skating dial, set it to "2" as well.
5.0 UPGRADES (SOLD SEPARATELY)
5.1
The 2M Red Cartridge that comes with your turntable is a solid cartridge. When it's time to switch styluses or you just want an upgrade, check out the Ortofon 2M Blue Stylus. It works with your current cartridge body and it's very easy to install. With its nude diamond stylus (vs. your diamond tip), it will provide better sound definition and forgiveness.

5.2
Audioengine offers affordable, silicone desktop stands for both the A2+ and A5+
- DS1 Speaker Stands for A2+ ($29)
- DS2 Speaker Stands for A5+ ($34)

5.3
Turntable Lab: Triple Operation Brush ($25) - The Carbon Fiber brush that your setup is great for everyday usage (we use one in our office). However, our new Triple Operation brush is on another level in terms of effectiveness with dual cleaning pads plus an integrated carbon fiber brush.

